When I saw this tweet from my friend Sarah Lewis over at Happy Humans, I knew I had to respond. It was full of wintastic:
Guest post: No thinking required from me. (Ok, I ended up having to think to format it to look good here, but I didn't have to actually come up with the post.)
Crafting: Crafting is always a win.
Baby stuff: Again, always a win.
So ladies and gentlemen (I know some of you guys out there sew, too!), here is a crafty, lots-o-pix tutorial to make your very own crinkly book for the really short humans in your life. Enjoy!
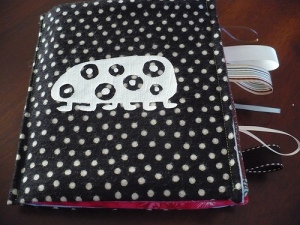
When my son Benjamin was born last December, someone gave us what she called a “quiet book,” a little six-page diversion meant to entertain a baby. We laugh at the term “quiet” in this context, because while it might keep the baby happy, each page contains cellophane, so the whole book makes a crunchy, crinkly racket.
Our grown-up observations aside, though, Benjamin loves it. He happily gnaws on the fabric pages and flings the whole thing hither and yon to hear it crackle. If that wasn’t convincing enough, my sister watches a little girl about Benjamin’s age, and she loves the book, too. She didn’t have one of her own, so I decided to make one for her. If you want to make one, too, here’s how.
Note: be sure to read everything once before starting. I’m telling you how I did it, but in retrospect, I would have done some things in different order, so read first to make that call for yourself. But also remember, it’s for a baby, and they don’t care if you make a few mistakes.
Determine how many pages your book will be. I opted for eight pages (including the “covers,” not that the covers were any different than any other page), which basically meant two long assemblies of fabric and cellophane, folded over in the middle. Counting front and back, that works out to eight pages.
Go in increments of four, and if you’re going to embellish, start small.
Get some cellophane or other crinkly, waterproof material. You’ll want the same number of cellophane pieces as you have pages (and they’ll be just slightly smaller than your pages). I went to a party store thinking to get a roll of cellophane, but ended up just getting four small bags (that I cut in half) because it was much cheaper and honestly, how many of these things am I going to make?
If you don’t already have a size in mind, you can determine your size by what kind of cellophane you find easily. I’m thinking of making another book using the plastic wrappers that encase the veggie burgers we buy.
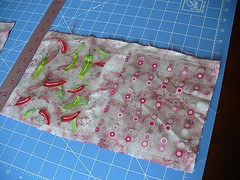
Choose and cut your fabric. I chose it based on feel (several different types to make it interesting for the baby) and look (since the book will live with my sister, I picked styles she likes). This is a perfect stash-busting project, too, because you need so little of each fabric, and mixing and matching is encouraged.
You’ll want one piece of fabric for every two pages, since you’ll fold everything in half. I also chose to put a piece of fleece the same size as my cellophane pieces between the layers to add a little bulk, making the pages easy to grab. I just picked some random fleece from my stash since it doesn’t show at all in the finished book.
I cut the main pages by laying the cellophane and fleece pieces out on them, with a gap of about 1½” between the two stacks, and left myself about ½” around the perimeter as a seam allowance.
- This is when I should have done my freezer paper stenciling (i.e. before attaching the plastic cellophane), since it involves ironing. More info at the point when I actually did
it.
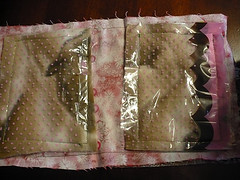
Sew the innards in place. More experienced sewers than I would probably have done this better, but I just made a stack of one piece of page fabric (wrong side up), cellophane, fleece, and cellophane again, and sewed it all together. You’ll only do this on half of the page pieces, as you’ll pair them in the next step.
I figured that sewing the stack would make everything stay in place better (and it seemed to). I sewed a basic square around the edge of each stack, but you could do fancy stitching of whatever sort you like.
Sew the other half of each page panel on. Just put a “loaded” page piece on top of an empty page piece (right sides together) and sew three sides together (two long sides and one short side), leaving the final side open to turn the page right-side-out.
I added loops of ribbon during this step (and I’ll tell you, it kind of turned my head inside out trying to figure out where to put them so they’d alternate colors and such on the final book). I put them on the short side I was going to sew, and pinned them between the two page pieces, with the looped end pointing toward the center. You could also add them in the next step if you prefer.
Turn the pages right-side-out and sew up the final edge. Again, people who are good at sewing probably have some brilliant way of doing this. I just kept reminding myself that the book is for a baby.
This is the point at which I actually did my freezer paper stenciling. I’m not going to do a tutorial on that here because there are already some really good ones, but I’ll add a few observations.
- If you’re going to embellish (with stenciling or anything else), do something fun, or at least something that you like better than everything else that’s commercially available. I was originally going to do some farm animals, because that’s what’s on the pages of the book we were given, but then I realized that I could do any thing I wanted, so I went with monsters (friendly ones!) instead.
- If you’re stenciling, don’t use the textured fabric paint that’s made for writing on t-shirts. I did, and it was very difficult to peel off the stencils because the paint was so rubbery. I did some freezer paper stencils on another project and used some basic matte fabric paint and that was much easier.
Sew the pages together. Yep, right down the middle. I did a second line of stitches with the book closed so that it would “default” to having the covers on the outside, but that’s totally your call. You can also do any decorative stitching (like a nice top-stitch around the edges, which I was too lazy to bother with) at this point or right before you sew them all together.


More photos of the whole process are available on Flickr.
Sarah Lewis is a happy new mama who sets up blogs for people and then teaches them how to blog through easy video tutorials. She also enjoys a variety of crafty hobbies, several of which have taken over the spare bedroom/office. Her husband loves her anyway.
|


No comments:
Post a Comment